


Installing Bavsound in your BMW is usually a lot simpler than people expect. For a typical Stage One installation, you're removing the factory speaker, unplugging the factory connector, installing the replacement, and putting the panel back together. No custom wiring, no coding, and no turning your garage into an automotive laboratory.
But there is an important distinction: not every Bavsound installation uses the same tools. A Stage One speaker swap is different from installing Ghost subwoofers or Revenant Pro, and some specific applications call for additional equipment. So the right question isn't "What tools do I need for Bavsound?" It's "What tools does my specific Bavsound installation require?"
✔ TL;DR
-
Most Stage One speaker installations require only basic hand tools.
-
A plastic trim tool, Torx bits, a Phillips screwdriver, and a small ratchet cover many common installations.
-
The Bavsound Universal Tool Kit puts the core tools for speaker, subwoofer, and amplifier installations in one place.
-
Some installations require additional tools. Certain Ghost V3 applications, for example, specifically require a heat gun and drill.
-
Always check the installation instructions for your specific BMW and Bavsound product before starting.
Quick Answer
For a typical Bavsound Stage One Speaker Upgrade, you'll want a few basic tools:
-
Plastic trim panel removal tool
-
Torx bits
-
Phillips screwdriver
-
Small ratchet or screwdriver handle
-
Small container for screws and hardware
That's enough for many BMW speaker installations.
Bavsound's BMW speaker installation guide specifically recommends a plastic trim removal tool, T20 Torx bit, Phillips screwdriver, and a small container for screws. The guide also makes clear that a typical Stage One installation doesn't require soldering, coding, or rewiring.
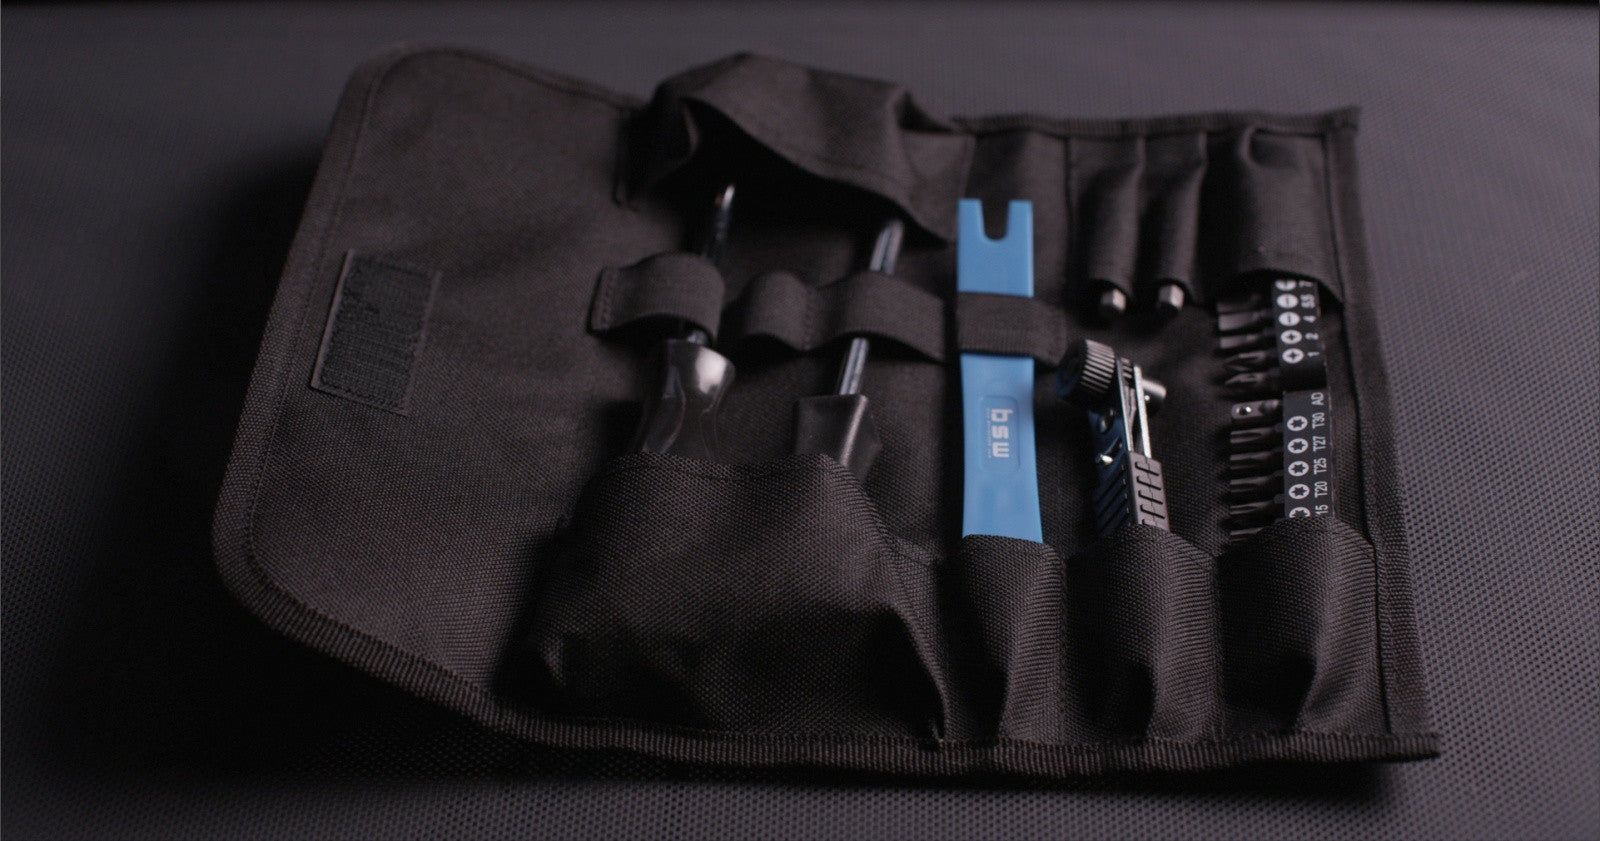
If you don't already have those tools, the Bavsound Universal Tool Kit is the convenient all-in-one option. It contains 37 pieces covering Bavsound speaker, subwoofer, and amplifier installations, including trim tools, ratchets, sockets, Torx bits, a wrench, and a pick.
But don't assume that means every Bavsound installation is identical.
Your BMW chassis and the product you're installing determine the actual tool list.
Start With Your BMW and Your Bavsound Product
Before you open the toolbox, figure out exactly what you're installing.
A Stage One speaker installation is generally a straightforward factory-speaker replacement. Ghost Underseat Subwoofers involve a different installation process. Revenant Pro has its own requirements as well.
That's why Bavsound has installation tutorials organized by vehicle and chassis.
Watch the tutorial for your BMW before you start pulling panels apart.
Ten minutes of preparation can save you a lot of guessing once you're halfway through the installation.
It also helps you catch something important before you start: BMW audio configurations aren't universal. Your model, production year, factory audio system, and speaker configuration all affect which Bavsound product and installation procedure applies to your car. The Build Your Kit tool is the easiest way to verify that you're working with the right application.
For Stage One, The Tool List Is Surprisingly Short
The whole point of Stage One is that you're replacing the factory speakers with components designed specifically for your BMW.
The factory connector stays.
The factory mounting location stays.
The car's wiring stays.
That is what makes this fundamentally different from a traditional universal aftermarket speaker installation.
 Plastic Trim Removal Tool
If you're buying one tool specifically for the job, make it this one.
BMW door panels are held in place with screws and clips. A proper plastic trim tool lets you work around those clips without attacking your interior with a screwdriver.
A metal screwdriver can leave marks on the trim that you'll notice every time you get in the car.
A plastic pry tool is a much better option.
The Universal Tool Kit includes both plastic and metal trim tools, along with the other tools needed for broader Bavsound installations.
 Torx Bits
Torx fasteners are common throughout BMW interiors, but the exact size varies by platform.
For many Stage One installations, you'll encounter a T20. Other BMW applications can use different sizes.
That's why the vehicle-specific installation tutorial matters more than memorizing one universal tool list.
The Universal Tool Kit includes a range of Torx and other bits, so you aren't left hunting for a different size halfway through the job.
 Phillips Screwdriver
Some BMW applications use Phillips-head screws alongside Torx hardware.
Again, this isn't something to guess about. Check your specific installation instructions first.
If your BMW uses one, you'll want a normal Phillips screwdriver or the appropriate bit.
 Small Ratchet
A small ratchet isn't necessarily essential for every Stage One installation, but it can make the job easier.
It's especially useful when you're working with fasteners that are awkward to reach or need a little more leverage.
The Bavsound Universal Tool Kit includes a ratchet, extension, sockets, and additional drive bits, so it's designed to cover more than just a basic speaker swap.
Something to Hold the Screws
This costs almost nothing and saves a ridiculous amount of frustration.
Use a small container, magnetic tray, or anything else that keeps your hardware in one place.
Keep door-panel screws separate from speaker-mounting screws if you can.
Because there is absolutely no reason for a thirty-second screw removal to become a two-hour archaeological excavation inside your BMW door.
Do You Actually Need the Bavsound Universal Tool Kit?

If you already have the appropriate hand tools, use what you have.
But if you're starting from scratch, the Bavsound Universal Tool Kit is designed specifically around these installations and gives you the tools in one place.
It currently includes:
-
Plastic trim panel removal tool
-
Metal trim panel removal tool
-
Right-angle pick
-
Ratchet
-
Extension
-
Multiple sockets
-
Torx bits
-
Phillips and flat-head bits
-
Wrench
-
Screwdriver/bit handle
And importantly, it's not limited to Stage One. The kit is designed to cover speaker, subwoofer, and amplifier installations, which is why it contains tools that you may not need for a simple speaker replacement.
Bavsound's own FAQ makes the same distinction: the toolkit isn't required, but having the appropriate pry tools and bits ready can make the installation faster and easier.
💡 Bavsound Insight
You don't need a proprietary tool to install Bavsound. The Universal Tool Kit simply puts the tools you're likely to need in one place, so you're not halfway through an installation wondering which drawer contains your T20.
But What About a Heat Gun and Drill?
Some installations need more than the basic Stage One tool set.
For example, certain Ghost Underseat Subwoofer V3 applications specifically state that they require a heat gun and drill.
That's not something you should infer from a general installation guide. It's a product-specific requirement, and the product instructions should take priority.
Heat can also come into play when you're working with sound-deadening material. Bavsound's sound-deadening guide explains that indirect heat from a heat gun, or even a hair dryer, can make the material more pliable and activate the adhesive.
So:
Stage One only? Start with the basic hand tools.
Ghost or another product with additional requirements? Check that specific installation first.
Adding sound deadening? A heat source may be useful or required depending on the material and installation.
The important thing is not to buy tools based on a generic list.
Buy them based on the actual job you're about to do.
What You Don't Need for a Typical Stage One Install
For a normal plug-and-play Stage One installation, you aren't building a custom car-audio system.
That means you generally aren't reaching for:
-
Soldering equipment
-
Wire cutters
-
Crimping tools
-
Coding equipment
-
Professional audio measurement equipment
-
Custom fabrication tools
The Stage One Speaker Upgrade is designed around the factory architecture of compatible BMWs, including the factory mounting locations and connectors.
That's the whole advantage of a vehicle-specific upgrade.
You're replacing the speaker.
You're not redesigning the car.
The One Step You Shouldn't Skip
Before you touch a single screw, watch the installation tutorial for your specific BMW.
Bavsound's installation tutorial library is organized around BMW platforms so you can see the actual process before you start.
Look for:
-
Where the door-panel screws are
-
Which trim pieces need to come off
-
Which Torx size is used
-
Where the clips are located
-
How the panel releases
-
How the factory speaker disconnects
-
Whether your specific application has any unusual requirements
This matters because even two BMWs that look almost identical from the outside can have different interior hardware and audio configurations.
The tutorial is there to remove the guesswork.
Use it.
💡 Bavsound Insight
The easiest installation isn't the one where you own the most tools. It's the one where you have the right tools for your specific BMW and upgrade.For a typical Stage One installation, that's a surprisingly short list. If you're installing Ghost, Revenant Pro, or another component with additional requirements, check that product's instructions before you start.
The good news is that having the right tools is usually enough to keep a Bavsound installation straightforward. The less-good news is that BMWs have never been particularly interested in making every generation use the same fasteners, access points, or installation process.
That's why the tool list should always follow the specific product and BMW application, rather than assuming every Bavsound installation is identical.
When the Basic Tool Kit Is Enough
For a typical Stage One installation, the job remains relatively simple.
You are working with the factory speaker location and factory wiring, so the installation is primarily about getting access to the speaker, removing the original hardware, and installing the replacement.
The Bavsound Universal Tool Kit is designed to cover this kind of work, along with broader speaker, subwoofer, and amplifier installations.
If you already own the necessary Torx bits, sockets, trim tools, and screwdrivers, you don't need to buy another toolkit.
If you don't own those tools, having them together in one place can make the installation considerably easier.
When You May Need a Heat Gun
This is where the answer changes depending on what you're installing.
Some Bavsound installations involve more than simply removing a factory speaker and replacing it.
For example, certain Ghost Underseat Subwoofer applications specifically require a heat gun and drill. That requirement is called out with the applicable product, so it should not be ignored or assumed away because another BMW installation didn't require either tool.
A heat gun can also be useful when working with sound-deadening material. If you're installing Bavsound sound deadening, controlled heat can help the material conform to the panel and activate its adhesive.
The important point is that a heat gun isn't a universal "Bavsound tool."
It's a tool for specific installations and applications.
If your installation instructions call for one, have it ready before you begin.
What About a Drill?
A drill falls into the same category.
You do not need a drill simply because you're installing Bavsound speakers.
For a standard Stage One installation, the goal is to use the factory mounting points and connections.
But certain product and vehicle combinations can have additional installation requirements. If your specific Ghost application says a drill is required, that's part of that installation and should be treated as such.
This is exactly why the Bavsound installation instructions should be checked before starting the job.
Don't buy tools based on someone else's BMW.
And definitely don't start drilling because a YouTube video from a completely different chassis did.
What If You're Installing Ghost Subwoofers?
Ghost deserves its own mention because the installation is different from a door-speaker replacement.
The Ghost Underseat Subwoofer installation guide walks through the process of moving the seat, removing the factory subwoofer, disconnecting the factory wiring, installing the Ghost, and reinstalling the seat.
The guide lists a Bavsound Universal Toolkit or equivalent, including Torx bits and socket wrenches, and estimates roughly an hour for the installation.
You'll also want to pay attention to the seat itself.
The installation requires access to the seat mounting bolts, and the guide specifically warns against fully disconnecting the seat because of the possibility of triggering an airbag warning light.
That's the sort of detail that makes watching the correct installation guide before you start considerably more useful than simply having a toolbox nearby.
Do You Need Professional Tools?
For the installations covered by Bavsound's DIY instructions, no professional workshop setup is assumed.
You don't need a pneumatic tool collection.
You don't need a professional audio analyzer.
You don't need a coding laptop sitting next to the car.
And you don't need to start buying tools simply because they look impressive.
What you need is the equipment specified for your particular installation.
For Stage One, that can be a remarkably modest collection of hand tools.
For Ghost or another installation with additional requirements, the list can be longer.
That's the distinction worth remembering.
The Tool Matters Less Than the Preparation
The easiest way to make a DIY installation difficult is to discover halfway through that you're missing something.
Instead, do this first:
Before you start
1. Identify your exact BMW.
Know the chassis, year, and factory audio system.
2. Identify your Bavsound product.
Stage One, Ghost, and Revenant Pro don't necessarily have identical installation requirements.
3. Open the installation instructions.
The Bavsound Installation Instructions let you select your vehicle and product to find the applicable guidance.
4. Check the required tools.
Don't assume. Verify.
5. Put everything within reach.
Then start the installation.
That five-minute preparation is much better than getting the door panel halfway off and realizing your T20 is sitting somewhere in a toolbox you haven't opened since 2019.
What Should Be in Your Garage?
If you're building a general-purpose Bavsound installation kit rather than preparing for one specific job, a sensible starting point looks like this:
| Tool | Typical Use |
|---|---|
| Plastic trim tool | Removing interior panels and clips |
| Torx bits | BMW interior and mounting hardware |
| Phillips screwdriver/bits | Applicable fasteners |
| Ratchet and extension | Seat and other mounting hardware |
| Sockets | Larger mounting bolts |
| Pick | Small clips and connectors |
| Small hardware tray | Keeping screws organized |
| Heat gun | Specific installations / sound deadening |
| Drill | Specific product/vehicle applications |
The Universal Tool Kit covers much of the core tool requirement, including trim tools, a ratchet and extension, sockets, Torx bits, a wrench, and a right-angle pick.
The heat gun and drill are deliberately listed separately because they aren't universal requirements.
💡 Bavsound Insight
The best tool kit is the one that matches your installation.
Stage One doesn't require the same preparation as every Ghost or amplifier installation, and BMW chassis differences matter too. Check the installation instructions first, gather the tools listed for your application, and then start the job. A little preparation is much easier than stopping halfway through with a disassembled BMW and one missing tool.
FAQ
Do I need the Bavsound Universal Tool Kit to install Stage One?
No. If you already have the appropriate hand tools, you can use them. The Universal Tool Kit is a convenient option if you want the common tools for Bavsound speaker, subwoofer, and amplifier installations together.
Do Bavsound installations require a heat gun?
Not all of them. Some specific applications require one, while a typical Stage One speaker installation does not. Always check the installation instructions for your exact product and BMW.
Do I need a drill to install Bavsound?
Not for a typical Stage One speaker installation. Certain product and vehicle applications can have additional requirements, so follow the instructions for your specific installation rather than assuming every Bavsound product installs the same way.
Can I install Bavsound myself?
Many Bavsound upgrades are designed for DIY installation using basic tools. The difficulty depends on the BMW, the factory audio system, and the product you're installing.
Where can I find the correct installation instructions?
Start with the Bavsound Installation Instructions and select your BMW and product. If you're unsure which kit applies to your car, the Build Your Kit tool can help identify the correct application.
Key Takeaways
-
Stage One: Basic hand tools are usually enough.
-
Universal Tool Kit: Make installs more convenient.
-
Ghost: Check the specific installation because some applications have additional requirements.
-
Heat gun: Required for certain applications and useful for some sound-deadening work.
-
Drill: Required for certain specific installations, not a standard Stage One requirement.
-
Installation instructions: Always check these before starting.
-
BMW compatibility: The correct product and installation procedure depend on your specific vehicle.
The goal isn't to own every tool in the garage.
It's to have the right tools for the BMW and Bavsound upgrade sitting in front of you.
Ready to Upgrade?
Once you know your BMW and the upgrade you're installing, getting the right tools is the easy part.
Use the Build Your Kit tool or email support@bavsound.com with your VIN and we will walk you through the right combination.
Share:
BMW G20 Hi-Fi Audio: What Is Actually Limiting the Sound?